Showing posts with label mompreneur. Show all posts

Wednesday, September 16, 2015

Fun Printable Stickers

I created some fun, color in, printable stickers for my oldest daughter because she is a creating, designing, crafting, stationary loving nerd junkie just like me! Lol....apparently the old saying is true, the apple does NOT fall far from the tree! Anyway, I thought I'd upload them so you can have some cool and fun printable stickers to enjoy with your teen/ pre-teen too.

I say I designed them for my daughter, but I think I secretly just might find them just as much fun for my work/office space as she did when she stuck them all over her notebooks for school. If not, more! :) So, don't feel bad if you find yourselves reaching for the sticky tape to put them around your own creating space mamas! I know that's exactly what I did! Eh, they're fun, why not?

This is how I colored mine, bright and funky of course! Fabulous. Lol!! Can't wait to see how you guys color & use yours. Don't forget to post your fun printable sticker pics to Instagram and tag me @lovealumni #LoveAlumniCrafts


Now print your own copy of these cute bad boys here:
FUN PRINTABLE STICKERS FREEBIE

Have fun getting creative!! Don't be shy and get your craft on! Use those hands!!


--XOXO from Malorie D. "Mom Life, Craft Life, Love Life"


Monday, September 14, 2015

Awesome & Easy Popsicle Stick Lanterns For Kids

My son Dom enjoying our project.

FUN & EASY POPSICLE STICK LANTERNS DIY

Hola, Hello!! So I figured we'd begin our crafting/creating journey with an easy & fun project that the kids can participate in. My son and I made some awesome paper lanterns and it was so much fun! My daughters were a little upset that we partook in this cool little project without them, but they were having a daddy-daughters outing so me & Dom didn't feel too bad about it. It was fun, & we can't wait to share this with you. So let's get to it!

***********The list of materials needed are as follows:***********
  • Wax paper (I used regular Reynold's wax paper we had in the kitchen.)
  • Popsicle sticks You will need 20 Popsicle sticks per lantern that you plan to make. (We chose the thick craft Popsicle sticks versus the thinner type to give us more space to paint & get artistic.)
  • Paint or markers (Any paint or markers will do but for best results we chose acrylic paint.)
  • Paint brushes (ONLY if you chose to utilize paint versus markers for your designs.)
  • Paint palette  (ONLY if you chose to utilize paint versus markers for your designs.)
  • Scissors
  • A pencil

  • Hot glue gun or tape (I don't know how to live without my glue gun in my life, so naturally of course I chose to use my hot glue gun versus tape. Also, it will make your lantern more durable & secure.) And of course NEVER allow a child to utilize a hot glue gun. No Bueno, very dangerous for burns!
  • Plenty of glue sticks- How many? Well, it depends on how liberally you plan to apply your hot glue, but not much is needed to keep these cool lanterns together. (Necessary ONLY if you choose to use a hot glue gun versus tape.)
  • A flat surface on which you could paint. (You can lay down a large cardboard, newspapers, or wax paper under your work area to protect the surface your working on.)


Prepare your work space.
Begin by laying out a large piece of cardboard on the floor and place a piece of wax paper about 16 inches in length and 16 inches in width, and tape the 4 corners down to prevent the wax paper from flying away or gliding around during your painting process. As I mentioned earlier, I chose to use acrylic paint for my lantern so I set out my paint palate and placed different colors to give myself plenty of choices in the color department. You don't want to limit your creativity by limiting your color choices. If you chose to use markers, then get your color on! If you chose to paint, then put your Picasso hat on and begin painting your wax paper however you please! Keep in mind that this wax paper will be cut into 4 quadrants later to create the walls of your lantern. Other than that, go crazy with your creativity and the color. Use as much or as little color combinations as you'd like!

Here are a few ideas for your wax paper art, just in case you hit an artistic drought:
  • Basic shapes, abstract designs, geometric shapes, patterns, intersecting lines, paint splatters, stripes.
  • Flowers, hearts, bows, emoticons, rainbows, butterflies, swirly designs, polka-dots.
  • Cars, superhero designs, ninjas, scattered numbers, scattered letters, animals.
I went a bit Dr. Seuss with my popsicles.
After you are done creating your masterpiece on the wax paper, leave it to dry and grab your popsicle sticks. Set out your 20 Popsicle sticks flat and separated about an inch apart on your work surface and paint those as well. Only one side of the popsicle stick needs to be painted. The blank side will be on the inside of your lantern which will not be displayed. Allow both the wax paper and popsicle sticks to dry completely. Once they are dry, you can either use tape or use your hot glue gun to bond the sticks together and create 4 of the same size squares as shown in the picture below.

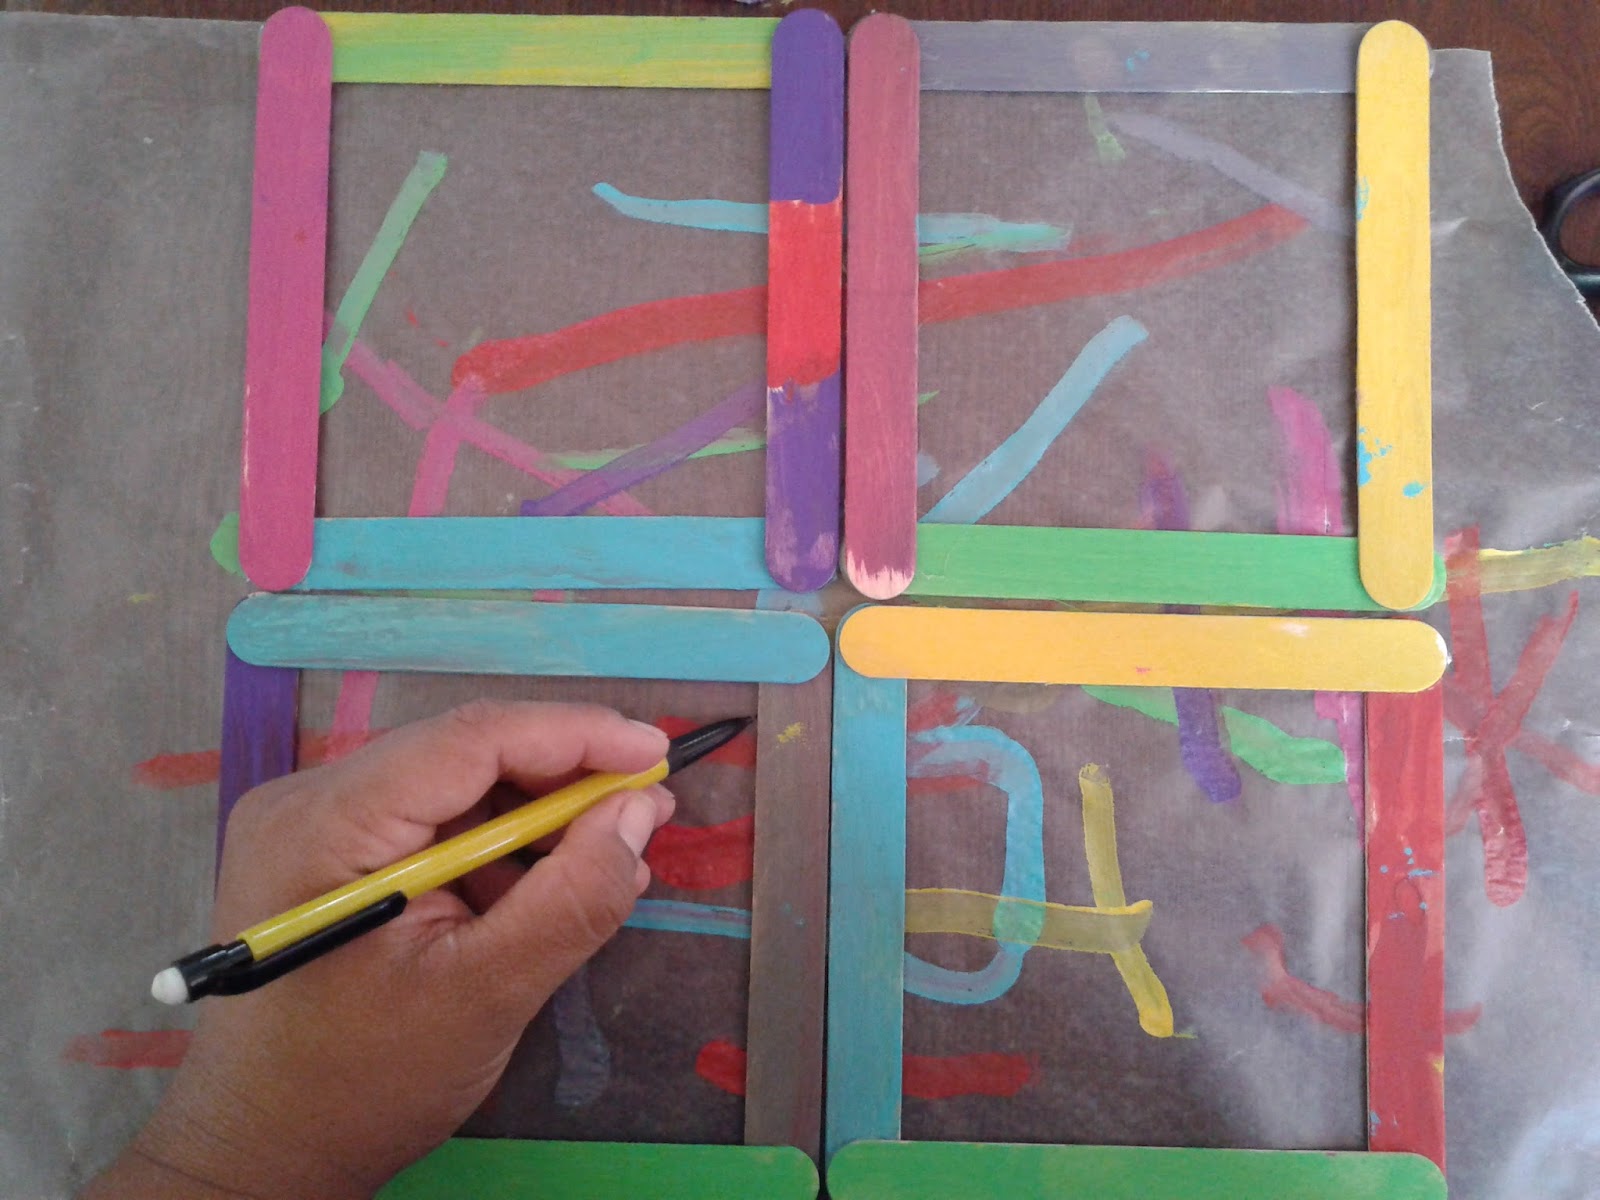
Next, you will lay your popsicle stick squares on top of your wax paper art so that you may trace the inner part of the square onto the wax paper with your pencil so you get the areas of artwork you'd like to be displayed as the walls of your lantern. Then, cut the wax paper along the lines you traced to create 4 squares as shown. Once you've cut out your squares from the wax paper, use your tracing pencil to erase any lines left so they do not interfere with your art on the wax paper.

Next, you tape or hot glue the wax squares you just cut out onto the back of the popsicle stick squares that are NOT painted. Make sure the wax paper is secured along all 4 corners of the tile and along all 4 sides creating 4 cool art tiles as shown in the picture below.

Dom's artistic tiles.
You can now begin creating a cube shape with your popsicle stick tiles that will consist of 4 sides, leaving the top and bottom portion exposed. Utilize the tape or squeeze hot glue onto the interior edges while creating your cube so that the tape or glue is not visible to the outside area of your lantern that is to be displayed. If using a hot glue gun, you must hold the tile edges together until the glue is dry or it will fall apart if the pressure is released too soon. Although hot glue dries relatively quickly, you should still be careful not to burn your fingers.

My funky art tiles.

Top view of the lanterns.
Lastly, use your last 4 popsicle sticks to create the base for your lantern, this will determine what is the bottom and the top of your lantern and will ensure that your lantern remains in an upright position as displayed in the photo on the left. Allow all the glue to properly dry.Now, you can place either a tea light candle (I like to use a scented tea light candle or votive candle.) or a flame less, battery operated candle which still gives the same glowing effect for your lantern inside the center.

PLEASE NOTE: (I HIGHLY recommend to ONLY use a flame less, battery operated candle for the kids! Kids should never have access to candles due to hot wax burns, or any open flame. Sorry, I know that is common sense, but being a mother I MUST mention it in my post. I want us all to have fun while getting our creative juices flowing, but BE SAFE!)

Dom did such a great job! He loved it!
And, VOILA!! You have an awesomely, incredible, artistic, personalized, DIY, wax lantern created with your own 2 fabulous hands, and lots of love!!! :) My son and I had a great time making these lanterns and we're proud of our creation! You should be too! This is a simple craft that can be done by anybody willing to try, and it's fun to do with the kids and really brings out their creativity. So put down your coffee (or wine), grab the kids, even the hubby, and use your hands to create & MAKE this awesome DIY lantern. Happy crafting my fellow mamas!

Until next time,      
                          -- XOXO from Malorie D. aka "Mom Life, Craft Life, Love Life"
The awesome & easy popsicle stick lantern DIY is complete!

***Please feel free to comment & share your pictures of your wax lanterns & YOUR family's process enjoying this project! I'd LOVE to see them! Post your lanterns on Instagram. Follow & tag us @lovealumni and #LoveAlumniCrafts 


Friday, September 11, 2015

Nice to meet you! Welcome to "Mom Life, Craft Life, Love Life!"

Hola, Hello! Welcome to my blog "Mom Life, Craft Life, Love Life!" My name is Malorie and I am the blessed mother to 4 incredible, and crazy kids ranging from 2 years old (actually, TERRIBLE twos with a capital T!) to 11 years old (aka the crazy, emotional, "I don't know who I am yet" stage). I currently am in a crossroads of leaving corporate management and now living in the land of "stay at home and focus on my passion of making, creating, crafting, and running my small business of handcrafted goods on Etsy Love Alumni Handcrafted Goods; all while cooking, cleaning, shuttling my 4 kids to and from school and practices, and running my charity efforts to donate journals I make with my own 2 hands to incredibly brave kids who have been exposed to domestic violence so that they can engage in therapeutic writing. Also, while still tending to our cheerful, loving dog Lola, and making sure I make time for my wonderful, hard-working husband!! (not in that order of course! Lol....)"

Any-who, it's all VERY exciting and stressful all at once but I figured I need some type of creative outlet so that I do not lose my mind in the process of this wonderful transition. Therefore, since I'm also an avid writer at heart, I said to myself, "Malorie, you need at least 1 thing you do for yourself besides having your delicious coffee while listening to gangster rap!" (lol, don't judge me.) And, WHALLA!!!!! This blog of awesomeness was birthed into my jumbled brain! :) I'm excited to incorporate my love for writing, crafting, creativity, motherhood, and above all, LOOOOOVE into one big, fantastic, therapeutic, blog! Considering that most of my work for my Etsy shop is done during what I like to call, "The Naptime Hustle Hour" aka "When my 2 year old finally goes down for her naptime." I will have to find a scheduling system that will work with my new blog, my business, my kiddos, hubby, and my charity efforts,.....BUT, it's going to be a great ride and I'm so excited to help you get your hand working and creative juices flowing! :) So thank you in joining me on this journey of crazy motherhood, crafting, family, love, life, and gallons, and gallons of coffee and wine (depending on the occasion and time of day). So grab the kiddos or conquer a couple of my fun crafting projects solo for some alone time (just in case that exists for some other lucky mothers out there lol), and let's have fun, and CREATE!